melon
Stückliste Rev. 1
The Melon is a relatively straightforward build. The only somewhat tricky part can be the LED, especially if you are using the WS2812B. If you have never hand-soldered SMD components before, it can be very helpful to watch a few tutorials on hand-soldering SMD components before starting.
1. LED
Start with the LED, as this is the most difficult part of the build.
You can use either a regular 3mm LED or a WS2812B. The two versions use different firmware, so make sure to choose the appropriate LED for the firmware you intend to use.
When placing the WS2812B, make sure to align the angled corner on the LED with the angled corner on the silkscreen:
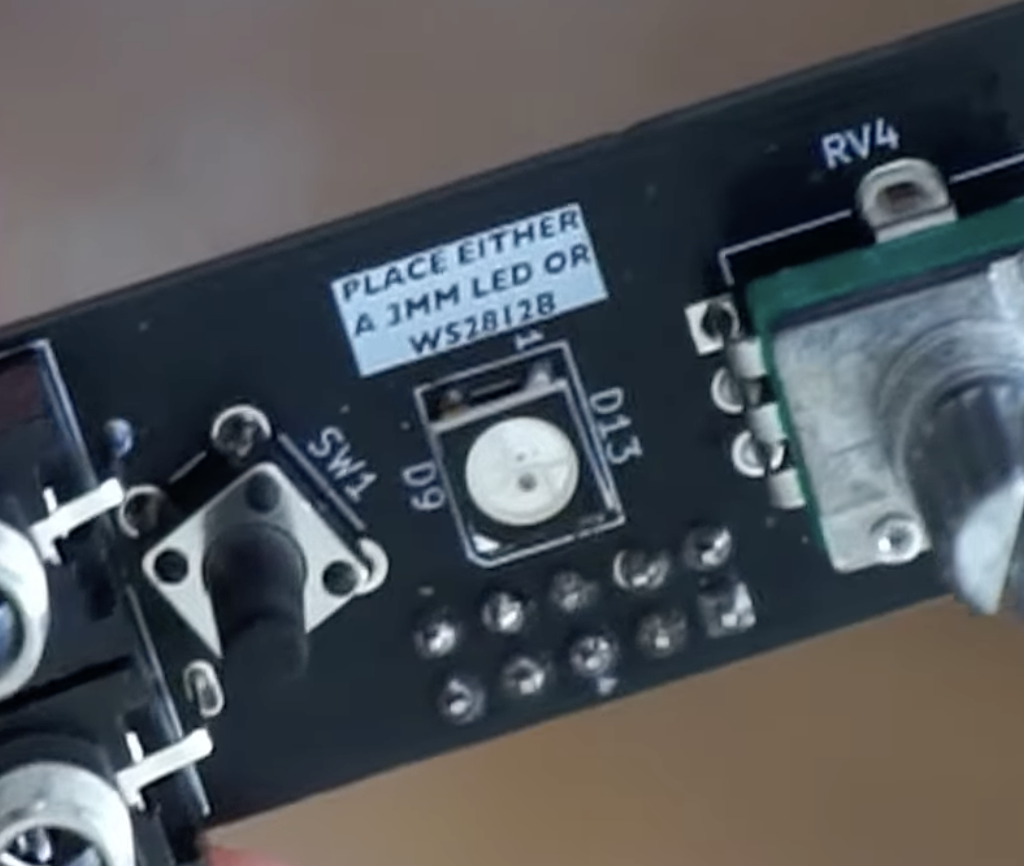
Take your time when soldering the WS2812B and double-check the orientation before soldering. Once the LED is installed, the rest of the build is comparatively straightforward.
If you are using the regular 3mm LED instead, install it in the position marked on the PCB and make sure to check the polarity before soldering.
2. Eurorack power header
Next, install the 2x5 Eurorack power header. Make sure the header is sitting straight and flush against the PCB before soldering it.
3. Potentiometers, jacks and button
Install the three B100K potentiometers, four PJ301M-12 jacks and the 6x6mm push button.
When installing the button, make sure it is sitting flat against the PCB before soldering it. This is important to ensure the button lines up with the hole in the front panel.
Also make sure that the potentiometers and jacks are properly seated against the PCB before soldering them.
4. Female pin headers
Install the two 1x7 female pin headers on the back side of the PCB. Make sure they are straight and properly aligned before soldering.
5. XIAO-RP2350-DIP
Insert the XIAO-RP2350-DIP into the female pin headers. Make sure it is fully seated and correctly oriented as marked on the silkscreen.
6. Final assembly
Once everything has been soldered, secure the potentiometers and jacks with their nuts and install the knobs.
Before powering up the module for the first time, give the PCB a final inspection. Check for solder bridges, unsoldered joints, incorrectly oriented components and anything else that could cause a short between the power rails.
7. Firmware
The firmware and flashing process depend on which LED you installed.
When using the WS2812B, use the web interface provided by wgd modular.
When using the regular 3mm LED, the easiest option to flash the module is by using the web interface provided by modulove.
Find out more information about the firmwares in the wgd modular repository or modulove repository.
| ID | Bezeichner | Package | Anzahl | Vorbestückt | Beschreibung | Anbieter |
|---|---|---|---|---|---|---|
| 1 | J1, J2, J3, J5 | PJ301M-12 | 4 | PJ301M-12 | Buchsen | |
| 2 | D13 | LED WS2812B PLCC4 5.0x5.0mm P3.2mm | 1 | WS2812B | ||
| 3 | SW1 | SW PUSH 6mm | 1 | 6x6x13 Switch | ||
| 4 | RV4, RV5, RV6 | Potentiometer Alpha RD901F-40-00D Single Vertical | 3 | B100K | Mono | |
| 5 | D9 | LED D3.0mm FlatTop | 1 | LED | ||
| 23 | J4 | Eurorack Power Header | 1 | EURO_PWR_2x5 | Stecker für Stromversorgung | |
| 24 | U3 | XIAO-RP2350-DIP | 1 | XIAO-RP2350-DIP | ||
| 25 | H1, H2 | 1x7 Female Pin Header | 2 | 1x7 Female Pin Header |
 click here
